Best Granite Resurfacing Options: The 2026 Professional Editorial
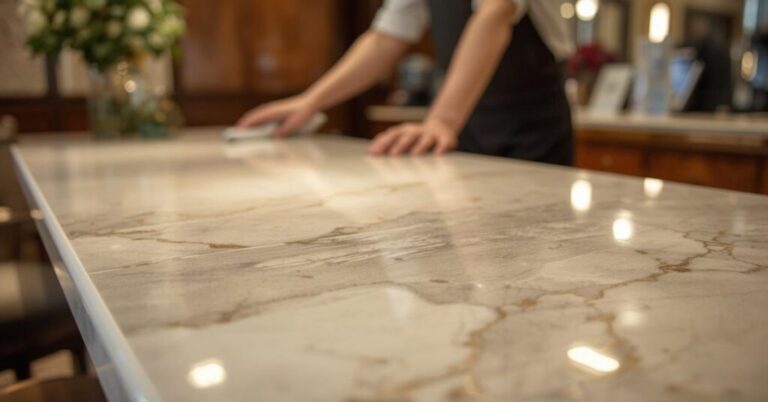
Granite occupies a specific echelon in the architectural hierarchy, valued for its extreme compressive strength and its relative immunity to the chemical etching that plagues calcareous stones. However, the very characteristics that make granite a superior building material—its high quartz content and interlocking crystalline structure—present unique challenges when the surface inevitably succumbs to the entropy of high-traffic use or environmental weathering. Resurfacing granite is not a cosmetic procedure; it is a mechanical intervention in one of the hardest natural substances utilized in design. Best Granite Resurfacing Options. To restore a granite surface is to perform a geological reset, stripping away micro-abrasions and mineral buildup to reveal the uncompromised crystalline face beneath.
In the contemporary built environment, the demand for granite restoration has shifted from simple “polishing” to a more sophisticated “surface re-engineering.” As architectural trends move away from the high-gloss “mirror” aesthetics of the 1990s toward more complex, tactile textures such as leathered, brushed, or velvet finishes, the methodology of resurfacing has evolved. We are no longer limited to a singular outcome. The modern practitioner must decide whether to restore the original factory finish or to pivot the stone’s character toward a matte or textured state that better serves the current programmatic needs of the space.
This transition requires a forensic understanding of mineralogy. Granite is not a monolithic material; it is a heterogeneous mix of quartz, feldspar, and mica, each possessing different “Mohs” hardness ratings. During a resurfacing operation, these minerals react differently to the heat and friction of diamond abrasives. Achieving a definitive, professional-grade result requires a systemic approach that balances mechanical force with chemical stabilization.
Undrstanding “best granite resurfacing options”
To effectively evaluate the best granite resurfacing options, one must first differentiate between “topical maintenance” and “mechanical resurfacing.” Many commercial products marketed as resurfacing kits are merely heavy-duty waxes or acrylic coatings designed to temporarily fill scratches and provide an artificial shine. True resurfacing is a subtractive process. It involves the use of heavy-duty planetary grinders and metal-bond diamonds to physically remove a microscopic layer of the stone’s face. If the process does not involve the removal of mineral mass, it is not resurfacing; it is a coating.
Oversimplification in the field often leads to the “Grit-Sequence Error.” Professionals understand that granite requires a much more aggressive grit progression than marble. Because quartz is so hard, skipping a stage in the diamond sequence (e.g., moving from 200 grit directly to 800 grit) will leave “ghost scratches” that are invisible during the wet phase of grinding but manifest as a cloudy, distorted reflection once the stone dries.
Another critical perspective involves the “Thermal Management” of the stone. Granite is a poor conductor of heat. During high-speed mechanical resurfacing, the friction generated can cause localized “thermal shock.” If the operator does not utilize sufficient water for cooling, the feldspar crystals can undergo a color shift or develop micro-fissures known as “stunt marks.” Consequently, the best granite resurfacing options are always those that prioritize “Wet-Processing” over “Dry-Shining,” ensuring the crystalline integrity of the stone remains intact while achieving the desired luster.
Deep Contextual Background: From Hand-Sanding to Diamond Resins
Historically, granite was considered “the stone of the immortals” precisely because it was nearly impossible to resurface once it was set. In ancient Egyptian and Roman contexts, granite was polished using blocks of harder stone (emery or corundum) and vast amounts of manual labor. The process took months, and the results were often limited to a dull, “satin” sheen. It wasn’t until the development of the steam-powered carborundum wheel in the 19th century that high-gloss granite became a repeatable architectural reality.
The true revolution in granite resurfacing occurred in the 1980s with the introduction of “Resin-Bonded Diamonds.” Before this, granite was typically ground using “Magnesite” blocks, which were heavy, slow, and prone to staining the stone with mineral residues. Diamond technology allowed for lighter, faster machinery that could be used on-site rather than requiring the slabs to be sent back to a factory. In 2026, we have entered the “Nano-Abrasive” era, where resurfacing compounds are engineered to work in tandem with the stone’s specific mineralogy, allowing for the restoration of “Exotic” granites that were previously deemed too fragile for mechanical grinding.
Conceptual Frameworks and Mental Models
To manage a resurfacing project, editorial and technical authorities rely on these frameworks:
-
The Subtractive-Equilibrium Model: View the surface as a topographical map. Resurfacing is the act of lowering the “Highlands” to match the “Valleys.” The goal is a perfectly flat plane, or “Planarity,” which is the foundation of a high-quality reflection.
-
The Differential Hardness Matrix: Treat the stone as a collection of different materials rather than one. By acknowledging that quartz resists abrasion more than mica, the technician can adjust the “Head Pressure” of the machine to prevent uneven wear.
-
The Slurry Management Framework: Recognize that the byproduct of resurfacing (the stone dust and water mix) is itself an abrasive. If the slurry is not managed correctly, it can “re-scratch” the surface, undoing the progress of higher-grit diamonds.
Key Categories: Resurfacing Modalities
Selecting the best granite resurfacing options requires matching the technique to the current state of the material and the intended final use.
| Category | Method | Depth of Cut | Final Aesthetic | Best Use Case |
| Mechanical Honing | Low-grit diamond pads | 0.5mm – 1.0mm | Matte / Satin | High-traffic floors, kitchens |
| High-Gloss Polishing | Full grit sequence (up to 3000+) | 0.2mm – 0.5mm | Mirror / Specular | Countertops, feature walls |
| Leathering / Brushing | Diamond-impregnated brushes | Surface-only | Tactile / Textured | Bars, outdoor kitchens |
| Thermal Flaming | High-temp oxygen-acetylene | 1.0mm – 2.0mm | Rough / Crystalline | Exterior plazas, ramps |
| Chemical Recrystallization | Fluorosilicate + steel wool | Zero (Topical) | High-gloss (Artificial) | Emergency staging (Temporary) |
| Planetary Grinding | Metal-bond segments | 2.0mm – 5.0mm | Perfectly Level | Severe lippage or damage |
Decision Logic: The “Lippage” Threshold
If the granite tiles are uneven at the joints (lippage), no amount of polishing will solve the visual distortion. In this scenario, the “Planetary Grinding” option is mandatory. This process “flattens” the floor into a monolithic sheet. Only after the floor is flat can the secondary stages of honing or polishing begin.
Detailed Real-World Scenarios Best Granite Resurfacing Options
Scenario 1: The “Dull” Corporate Plaza
A black granite floor in a high-rise lobby has lost its luster due to 15 years of “salt tracking” and sand abrasion.
-
The Failure: Attempting to “buff” the floor with polishing compounds. The stone is too hard; the compounds just sit on top.
-
The Fix: A full 5-stage mechanical resurfacing sequence (100, 200, 400, 800, 1500 grit).
-
The Result: The “micro-pitting” from the sand is removed, and the deep black color is restored through mechanical clarity.
Scenario 2: The “Plucked” Kitchen Island
An exotic granite with large mica “books” is ground with a high-speed hand tool.
-
The Failure: The mica chunks are “plucked” out, leaving small holes.
-
The Fix: Filling the voids with color-matched UV-cured resin, followed by a slow, “wet” honing sequence using high-weight floor machines to ensure even pressure.
Planning, Cost, and Resource Dynamics
The economics of granite resurfacing are significantly higher than marble due to the “Abrasive Consumption Rate.” Granite wears down diamond pads 3–4 times faster than softer stones.
| Cost Component | % of Total Investment | Direct Drivers |
| Diamond Tooling | 30% | Stone hardness, square footage |
| Labor (Machine Time) | 45% | Number of stages in the sequence |
| Water/Waste Management | 15% | Rigging, slurry filtration |
| Sealing / Final Finish | 10% | Solvent vs. Water-based protectants |
The Range-Based Analysis: Professional resurfacing typically costs between $10 and $25 per square foot. While this is a significant “Direct Cost,” the “Opportunity Cost” of replacement (demolition, new slabs, plumbing, and installation) often exceeds $150 per square foot, making resurfacing the most fiscally responsible asset management strategy.
Tools, Strategies, and Support Systems
-
Planetary Floor Machines: Utilizing three or four counter-rotating heads to ensure the stone is ground “Flat” rather than just “Shiny.”
-
Metal-Bond Diamonds: Essential for the first “Leveling” pass; resin pads are too soft to cut through granite’s quartz peaks.
-
HEPA Slurry Vacuums: For immediate removal of granite dust, which contains silica and must be managed under OSHA respiratory standards.
-
Weight-Loading Plates: Adding up to 100 lbs of additional weight to the machine to provide the “Down-Pressure” required to cut granite.
-
Gloss Meters (GU): To provide a quantitative “Baseline” and verify that the finish is consistent across the entire project area.
-
Edge Grinders: Hand-held units with vacuum shrouds for resurfacing perimeters where the large machine cannot reach.
-
Snail-Lock Backers: For rapid tool changes between grit stages to minimize “Machine Downtime.”
-
Resin Fill Kits: For repairing the natural “vugs” or pits that are often revealed during the grinding process.
Risk Landscape and Failure Modes
-
Thermal “Blueing”: Occurs when the stone gets too hot, causing a permanent blue-tinted discoloration in the feldspar.
-
Picture Framing: When the edges of a room are polished more (or less) than the center, creating a visible “border” effect.
-
Slurry Staining: If the water used during grinding is too acidic or has high iron content, it can stain the stone’s pores as they are “opened” by the diamonds.
-
Structural Weakening: If too much material is removed from a thin (2cm) slab, it may lose its ability to support its own weight or bridge a span.
Governance, Maintenance, and Long-Term Adaptation
A successful resurfacing project requires a “Post-Op” governance structure:
-
The “First 72” Rule: Avoiding any acidic cleaners or heavy oils for 72 hours while the “Impregnating Sealer” fully cures within the newly opened pores.
-
The Abrasive Audit: Implementing a “Walk-off Mat” system at all entrances to trap 90% of the sand that would otherwise act as a grinding agent on the new finish.
-
Quarterly Luster Review: Using a gloss meter to track “Luster Drift.” If the GU (Gloss Units) drop by more than 15%, a “Light Maintenance Buff” should be scheduled to prevent the need for full resurfacing.
Measurement, Tracking, and Evaluation
-
Leading Indicator: “Surface Energy” (measured via Dyne pens). If the surface energy rises, the protective seal is failing, and the stone is becoming “Absorbent.”
-
Lagging Indicator: The appearance of “Traffic Patterns” in the reflection of overhead lights.
-
Documentation: Maintaining a “Stone Lifecycle Log” that tracks the specific diamond sequence used, allowing for perfect matching in future repairs.
Common Misconceptions and Industry Myths
-
“Granite is indestructible.” False. While hard, it is brittle and susceptible to “impact fractures” and “thermal shock.”
-
“You can resurface granite with marble pads.” False. Marble diamonds are too soft and will “glaze over” or melt when they hit granite quartz.
-
“Store-bought sprays can resurface stone.” False. They are temporary “fillers,” not structural resets.
-
“Resurfacing creates a mess of dust.” False. Modern professional resurfacing is a “Wet” process that creates a slurry, which is vacuumed away instantly.
-
“All granites are the same.” False. A “Black Absolute” is a gabbro (no quartz) and requires a completely different diamond sequence than a “Luna Pearl.”
-
“You should seal granite every month.” False. A high-quality resurfacing job paired with a premium solvent sealer should last 5–10 years.
Ethical and Practical Considerations
In the 2026 landscape, resurfacing is the ultimate “Sustainability” play. The carbon footprint of quarrying, finishing, and shipping a new granite slab from Brazil or India to North America is massive. By choosing the best granite resurfacing options, owners are essentially “Recycling” their stone in place, extending its functional life by decades and reducing landfill waste. Practically, one must also consider the “Disruption Cost”—resurfacing a kitchen takes 2 days; replacing it takes 3 weeks.
Conclusion: The Persistence of Crystalline Clarity
The decision to resurface granite is an acknowledgment of the material’s inherent value. It is a technical process that respects the igneous origins of the stone, using modern diamond technology to peel back the layers of time. Whether the goal is to restore a high-gloss specular reflection or to pivot toward a modern, tactile leathered finish, the “Best” option is always the one that prioritizes the stone’s mineral health over a quick aesthetic fix. A properly resurfaced granite floor or countertop is more than just clean; it is a renewed architectural asset, standing as a permanent testament to the endurance of natural materials.